Nth-name Selections in HubSpot Mailing Lists Using Chartio
Posted by on November 24, 2015 Chartio, Data Analytics
HubSpot does a good job of managing email lists. It’s extraordinarily flexible in defining lists for your promotions and nurturing campaigns.
But if you want to test a list or a promotion, there’s no way inside of HubSpot to select a portion of your list (say, 10%) to receive a test email and either send the remainder a default email or reserve it for other promotions in the future.
Recently, we wanted to send a promotion to users who had responded to our Net Promoter Score survey, but we only wanted to send it to about third of those users, and reserve the option to send it to more users in the future, depending on the performance of the original mailing.
The correct way to do this would be to mail to every third name on your list. This is called an “nth name selection”. Of course, you’d also need to keep track of which people received the mailing, so you could use them or not for future mailings.
HubSpot recommends a three-step process for nth-name selections: (1) export your list as a CSV file, (2) open the CSV file in a spreadsheet and create a new column to flag every nth name, and (3) import the CSV file back into HubSpot.
That’s OK as far as it goes. HubSpot makes it pretty simple to export and import lists, so it can be done fairly fast and probably consistently. When you import a list, HubSpot does a good job of keying the import to the email address, so that it updates or creates the correct properties for each user in the HubSpot database.
But we wanted a process with a few features we couldn’t get from this workflow, it needed to be:
- Reproducible in the future with minimal training
- Reliable in that it put a given user in the same bucket every time
- Driven by our customer database
Since we wanted to mail to a subset of users who had answered our Net Promoter Score survey, we decided to build the process on top of our NPS workflow.
We already had Chartio export table and workflow for importing NPS scores to HubSpot. We only needed to add a column to our NPS chart called NPS Selector, which gave every user who had rated us in our NPS survey a number from 1 to 10. We assigned that number by dividing the User ID by 10, taking the remainder and adding 1.
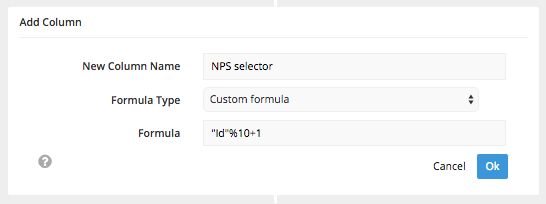
We added a column to each user with a selector based on the user’s ID.
Now, whenever we import NPS scores into HubSpot, each respondent also comes with a number from 1 to 10. This allows us to select the list in 10% increments.
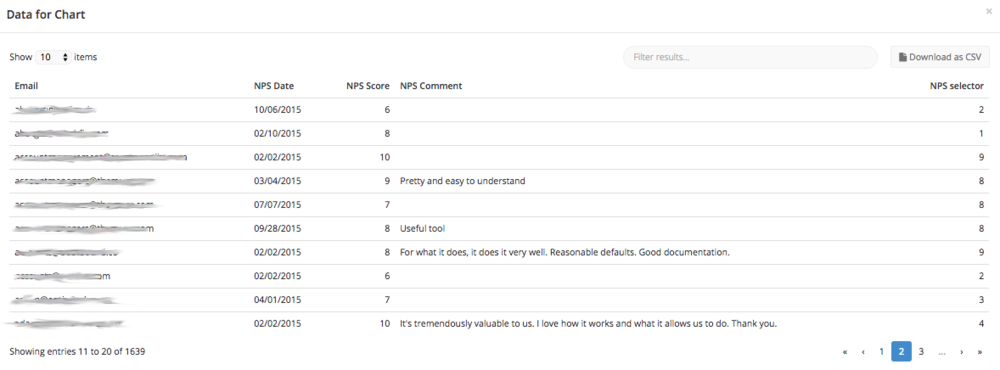
When we create the list for import to Hubspot, it now includes the NPS Selector property.
HubSpot makes it easy to create lists based on properties that have already been assigned to your users and leads.
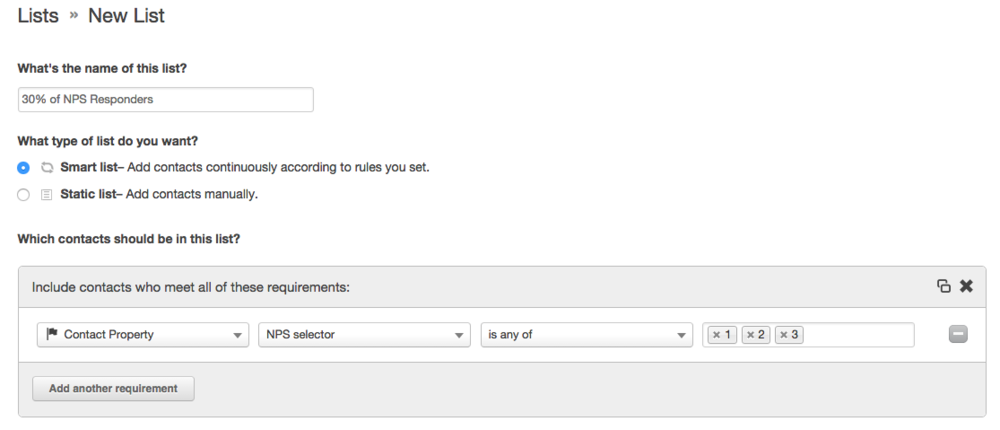
HubSpot makes it easy to create email lists based on the selector field
Now that we’ve added a property that allows us to select 10% of our list at a time, based on Chartio’s unchanging User ID, we’re able to reliably assign selectors to new customers and NPS responders while maintaining our existing nth name selections.
This means that in the future, all new respondents will be assigned a selector as soon as they’re imported - no additional steps required. And we can expand this program to other groups of users while maintaining the integrity of our original list.