Alerts
In Chartio, an Alert is essentially a Single Value chart with a threshold. Chartio runs your query at the scheduled interval, and if the value returned meets your specified threshold, we send an email with a customized message.
You can send an Alert to anyone, whether or not they’re a Chartio user. You can also schedule Alerts for non-numeric values like text or dates.
To view and manage your Alerts, open the Alerts admin page from the top navigation bar.

Check out our short video below to see how to create an Alert:
Create an Alert
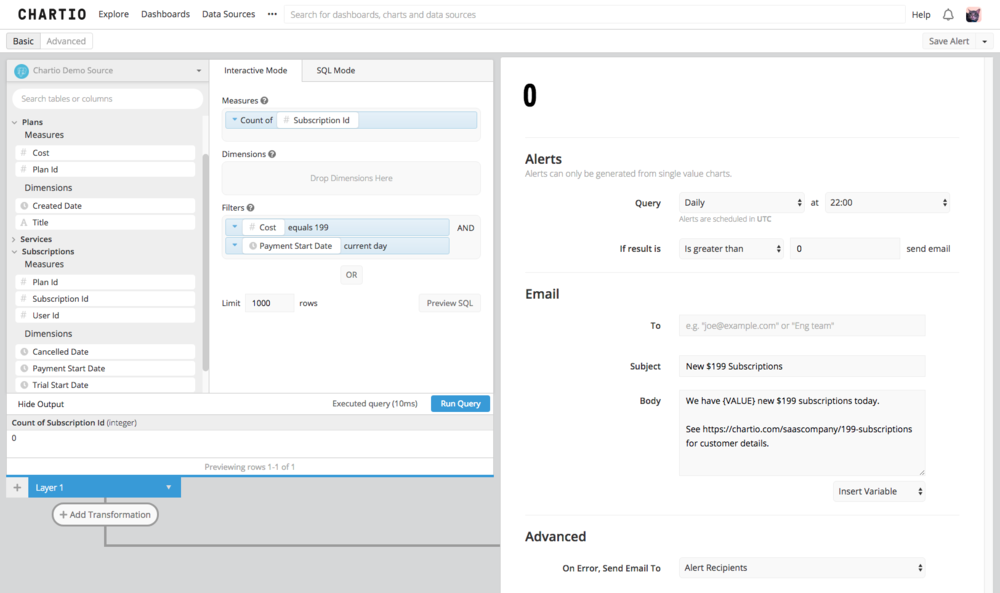
To create an Alert, go to the Alerts admin page and click + Add Alert. Build your query as you normally would for any chart and ensure that your final result set returns a single value.
If you’re new to Chartio, you may want to review our Quick Start Guide first.
Set the Query schedule, along with the threshold required to trigger the Alert. Add email addresses in the To field for recipients you’d like to receive the Alert, pressing Enter after each recipient to add them. Add a custom subject and body text to be sent in the Alert email. Include a dashboard URL in the email to provide more context for the Alert.
{THRESHOLD} and {VALUE} are variables you can include in the Subject and Body of your email to refer to the Alert threshold trigger and Alert value, respectively. These automatically update depending on the query results.
| In the Visual SQL interface |
|---|
 |
| In the Data Explorer interface |
|---|
 |
Create from a chart
Permissions required: Dashboard Editor and requisite data source access
You can also create an Alert from an existing Single Value chart. Navigate to a dashboard with a Single Value chart. Click the chart’s menu and choose Clone to Alert. This opens the chart in the Alert editor, allowing you to save a copy of your chart as a new Alert.
When you save your new Alert, it’s no longer associated with the original chart. Any changes made to the chart won’t automatically update the Alert and vice versa.

Delete an Alert
Permissions required: Alert Admin
From the Alerts list, click the Alert’s menu under Options and choose Delete from the dropdown.

Disable an Alert
To disable an Alert without deleting it altogether, simply remove all recipients and save the Alert. The Alert still runs at scheduled times but no recipient will be notified.
If you’d like to re-enable an Alert going forward, simply add recipients back to the Alert and it will be sent out following the set schedule.
Permissions
Alerts have two access levels: Editor and Admin. Similar to charts, anyone can create an Alert using a data source they have access to.
Alert Admins
- Owners are granted Admin access to all Alerts by default
- Can grant and view Access Settings
- Can edit and delete the Alert
Alert Editors
- Can edit the Alert
Receiving an Alert
You may send Alerts to any email address you wish, whether or not they’re a Chartio user.
Alert emails are designed to be flexible, allowing you to integrate your Alerts with third-party automation software or even Slack if you wish.
