Amazon S3 CSV integration
Creating an S3 bucket
-
Create an S3 bucket on your Redshift Cluster. If your bucket and cluster aren’t in the same region, you may need to run additional charges for data transfer.
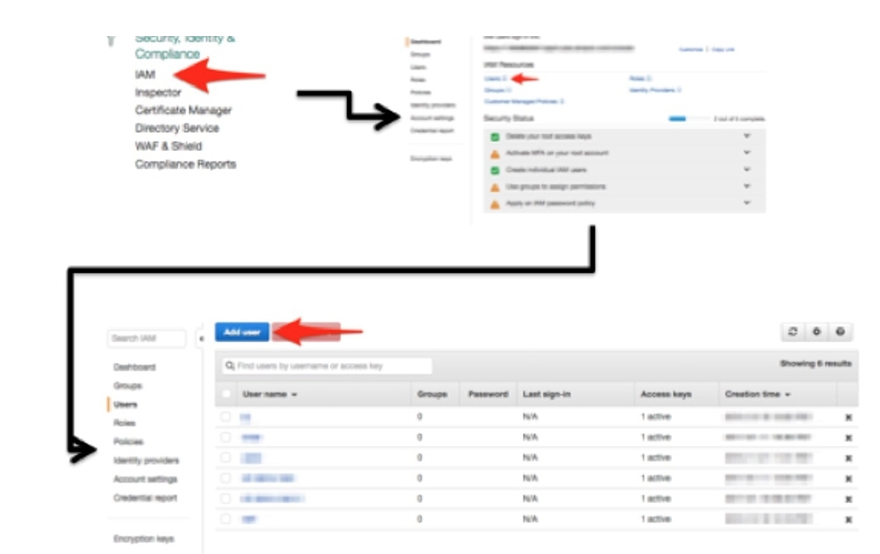
a. Create a new user. Click on IAM in the AWS services dashboard. Click Users and then Add User.

-
If your cluster has been used by your organization before, you’ll likely see a list of users that have already been added on the IAM home screen. You should also see a button that says Add user.
a. Create a unique username.
b. Enable programmatic access so your user has an access key ID and secret access key.
c. Save the Access key ID and Secret access key.

-
Add an inline policy using the policy generator. Use the dropdowns to select the correct action then add in the name of the S3 bucket you created.
Using the policy generator creates a JSON Blob that looks something like this:
"Statement": [

	{

		"Sid": "Stmt1484751442000",

		"Effect": "Allow",

		"Action": ["s3:*" ],

		"Resource": ["arn:aws:s3:::chartio-tim-test/"]

	}

]
Copying data to Redshift
-
Create the table in your Redshift instance. This will connect to Chartio and will be what you query from.
An example of the CREATE TABLE command:
CREATE TABLE demo_data ( id INTEGER NOT NULL, campaign_id CHAR(256) NOT NULL, month DATE NOT NULL, city CHAR(256) NOT NULL, state CHAR(256) NOT NULL, amount CHAR(256) NOT NULL ); -
Access your Redshift Instance through a SQL client in order to execute a create table statement. Good examples to do this are DataGrip, SQL Workbench (free), re:dash, SQuirreL, and Windows SQL Client.
a. Download and install Amazon’s Redshift JDBC or ODBC driver.
-
Get data into your Redshift Instance using the COPY command.
a. Create a manifest file to make sure that the COPY command loads all the fields properly. An example:
{

	"entries": [

		{"url":"s3://chartio-tim-test/s3+upload.csv", "mandatory":true}

	]

}
b. Write a COPY command to load your CSV’s data into your table that you created on your Redshift Instance.
c. Parameters of COPY command:
Parameter of COPY command Description COPY Where you input your table’s schema name and table name FROM Where you direct your table to look in the manifest file you created WITH CREDENTIALS ‘<access key id; secret key>’ When you created your S3 bucket, we mentioned the importance of the access key and secret key and this is where it comes into play REGION ‘us-east-1’ The AWS region of your S3 bucket MANIFEST This tells your COPY command that the path in the FROM clause is to a manifest file TRUNCATECOLUMNS ACCEPTINVCHARS Forces Redshift to accept invalid characters by replacing them with a “?” FORMATTING Helpful in ensuring your data is successfully input into your table OPTIONAL Helpful in ensuring your data is successfully input into your table An example:
COPY public.table_name_s3_demo

FROM 's3://data-source-domain/domain.manifest'

WITH CREDENTIALS 'aws_access_key_id=;aws_secret_access_key='

REGION 'us-east-1'

MANIFEST

DELIMITER ','

IGNOREHEADER 1

DATEFORMAT AS 'MM/DD/YYYY'

TRUNCATECOLUMNS

ACCEPTINVCHARS

FILLRECORD
Troubleshooting
- Datetimes can be difficult to work with; if you run into errors while loading a field that contains dates or date times:
- Use
ACCEPTANYDATEto force Redshift to accept your date no matter what. - Or, use
DATEFORMATAS"MM/DD/YYYY"to dictate a specific formatting.
- Use
ACCEPTINVCHARSwill be very helpful as it forces Redshift to accept invalid characters by replacing them with a “?”.DELIMITER ','tells Redshift that your delimiter is a comma since this is a CSV.IGNOREHEADER 1tells Redshift to ignore your CSVs header line.
Additional resources
- Supported data types in Amazon Redshift
- Amazon’s steps for creating an S3 bucket and uploading a CSV
- Data sources in Chartio
- CSVs in Chartio
- Amazon Redshift
- Loading data into Amazon
- Using a manifest file on AWS
- AWS’ COPY command documents
- AWS optional parameters
- Connecting Chartio to a Redshift Instance
- AWS documentation on STL load errors