Allow Chartio's IP Address
A prerequisite for setting up direct connections to your data source in Chartio is allowing communication from Chartio’s IP address (52.6.1.1). We’ve provided instructions for how to do this for some of our most popularly connected data source types:
- Amazon RDS
- Amazon Redshift
- Google Cloud SQL
- Microsoft Azure
- Microsoft SQL Server
- PostgreSQL
- Snowflake
Amazon RDS
For Chartio to connect to your Amazon RDS database, you’ll need to modify your RDS Security Group to allow Chartio’s inbound IP address. To view your Security Groups, access your RDS Dashboard.
Add a new Inbound Rule
- From the AWS Management Console, click Services > EC2 > Network & Security > Security Groups.
- Next, you’ll need to edit the Security Group you want to use.
- If you have an existing Security Group you’d like to modify…
Select it from the list then click Actions > Edit Inbound Rules. - If you don’t have a Security Group yet…
Click Create Security Group to add a new one.
- If you have an existing Security Group you’d like to modify…
- Select the Inbound tab then click Add Rule, completing the CIDR (Classless Inter-Domain Routing) form and allowing incoming connections.
- For the Port Range, use the corresponding port number for your database type:
- MySQL or MariaDB:
3306 - Postgres:
5432 - SQL Server:
1433 - Oracle:
1521
- MySQL or MariaDB:
- For the IP address, use
52.6.1.1/32

- For the Port Range, use the corresponding port number for your database type:
- Click Apply (for existing Security Groups) or Create (for new Security Groups) to save your new rule.
Connect your new Security Group to your RDS database
If you created a new Security Group, you need to apply it to your RDS database.
-
Click Databases > {your database instance name} > Modify.

- Scroll to the Network & Security section.
-
Select your newly created Security Group from the list to add it.

- Click Continue.
- Under Scheduling of modifications, select when you’d like to apply your changes:
- If you choose Apply immediately, your changes are applied right away.
- If you choose Apply during the next scheduled maintenance window, you can minimize the risk of possible downtime to your database instance.
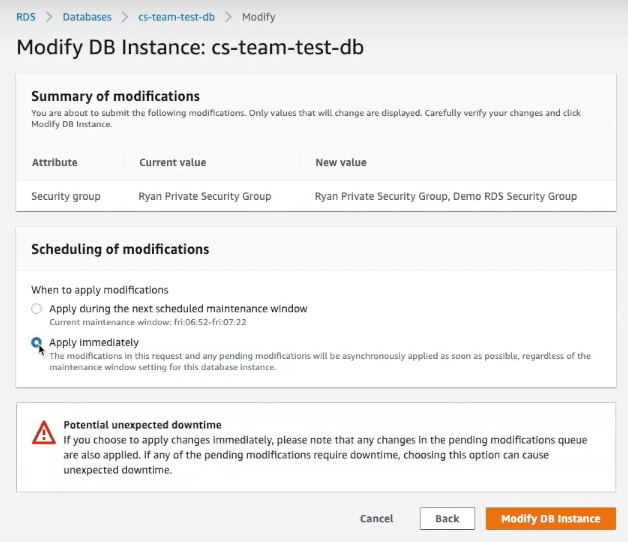
- Click Modify DB Instance to apply your changes. You’ll be taken back to your database instance’s summary page, where your newly added Security Group should appear under the VPC security groups.
Refer to our Amazon RDS page for further instructions on connecting Amazon RDS to Chartio.
Amazon Redshift
For Chartio to connect to your Redshift database, you’ll need to allow our inbound IP address ( 52.6.1.1/32 ) in your Cluster’s Security Group settings:
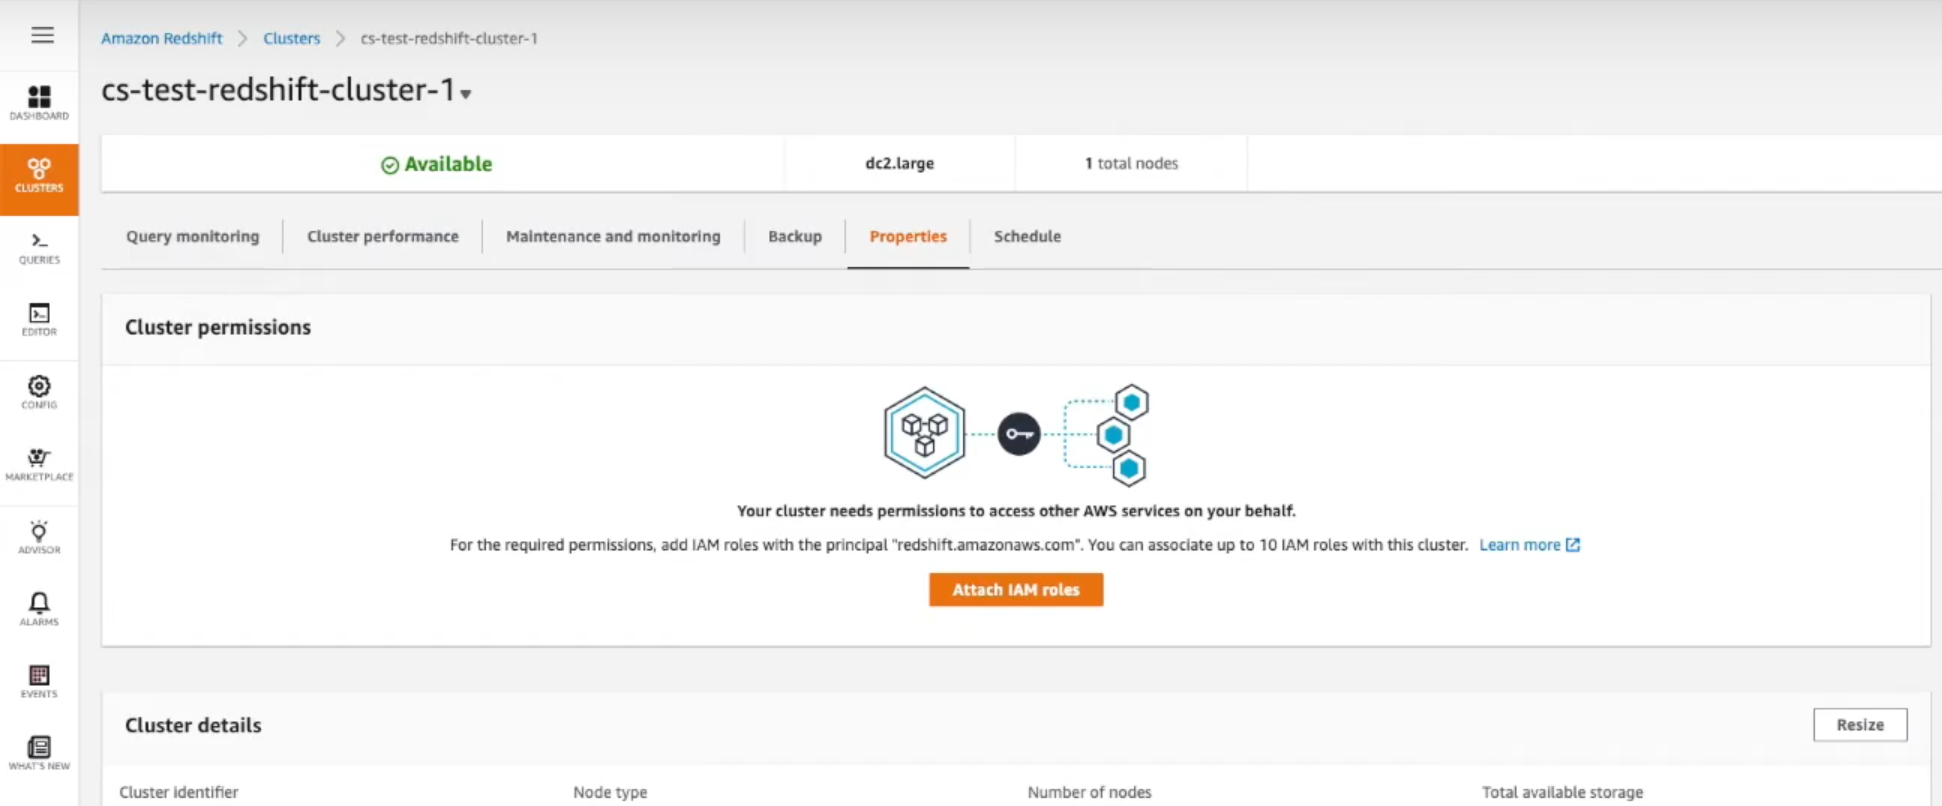
- Log in to the Redshift Management Console.
- Select Clusters from the left sidebar then select the cluster you want to connect to Chartio.
-
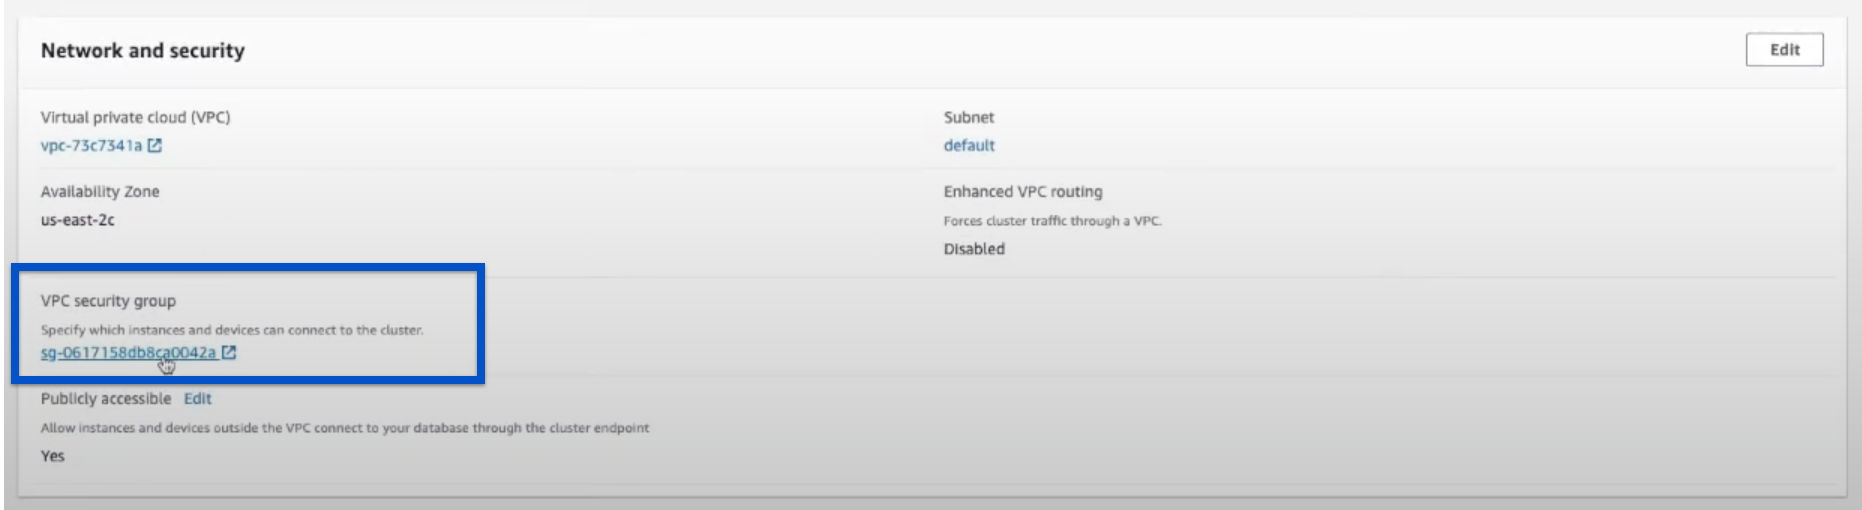
From the Cluster Details page, navigate to the Properties tab and scroll to the Network and security section.
-
Under VPC Security Groups, click the Security Group you want to use to allow communication from Chartio.
-
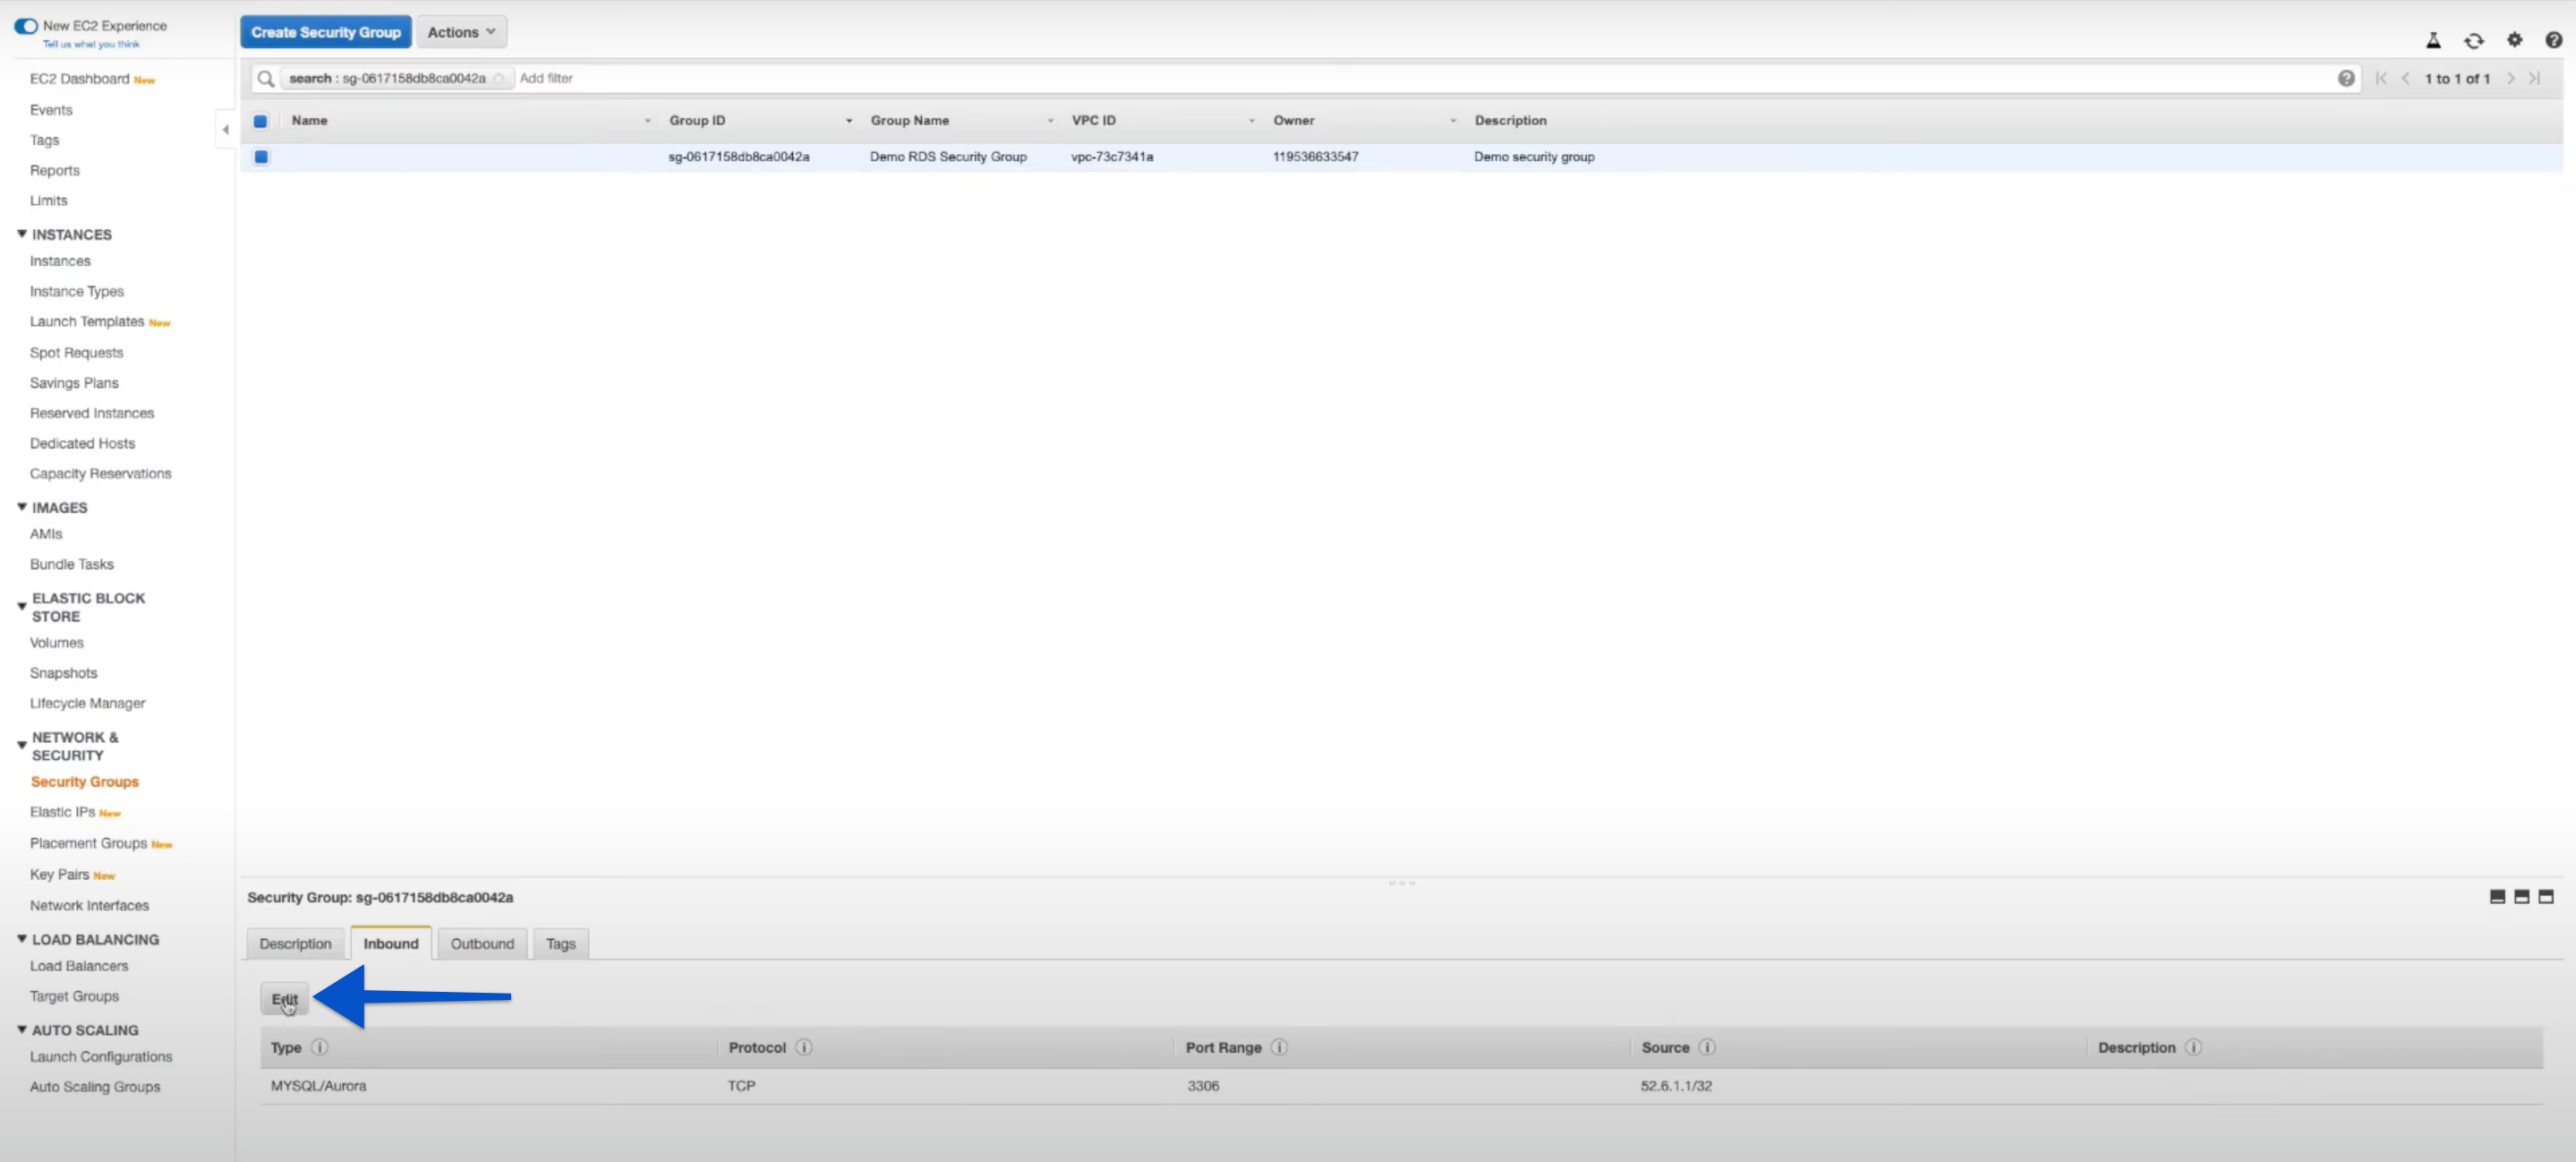
Click the Inbound Rules tab at the bottom of the page then click Edit.
-
Click Add Rule to add a new Inbound Rule.
a. Set the Type to Redshift.b. Adjust the Port, if needed.
c. Enter the following into the Source field:
52.6.1.1/32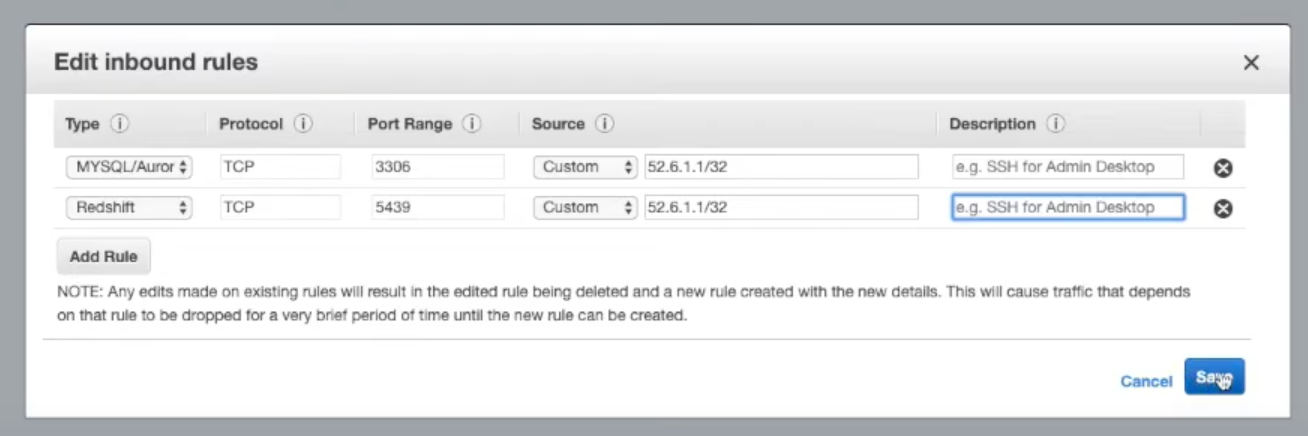
- Click Save.
Refer to our Amazon Redshift page for further instructions on connecting Amazon Redshift to Chartio.
Google Cloud SQL
Ensure that the Chartio IP address has been allowed to access the Google Cloud SQL instance. To do this, open the Google Cloud console and do the following:
- Navigate to the SQL server instance.
- View the Connections tab.
-
Ensure the Public IP option is selected and click Add Network.

-
Enter
Chartioas the name of the network with the following CIDR:52.6.1.1/32.
- Click Done to add the new network, then click Save to save your connection changes.
Refer to our Google Cloud SQL page for further instructions on connecting Google Cloud SQL to Chartio.
Microsoft Azure
- Log in to your Microsoft Azure account.
- Select SQL Databases from the navigation, then select the name of the database you’d like to connect to.
-
Go to the Overview page for your database and click Set server firewall near the top of the page.

- Select No for Deny public network access. If you select Yes, you won’t be able to connect to Chartio.
-
Add a new rule using the following IP address:
Rule name:
Chartio
Start IP Address:52.6.1.1
End IP Address:52.6.1.1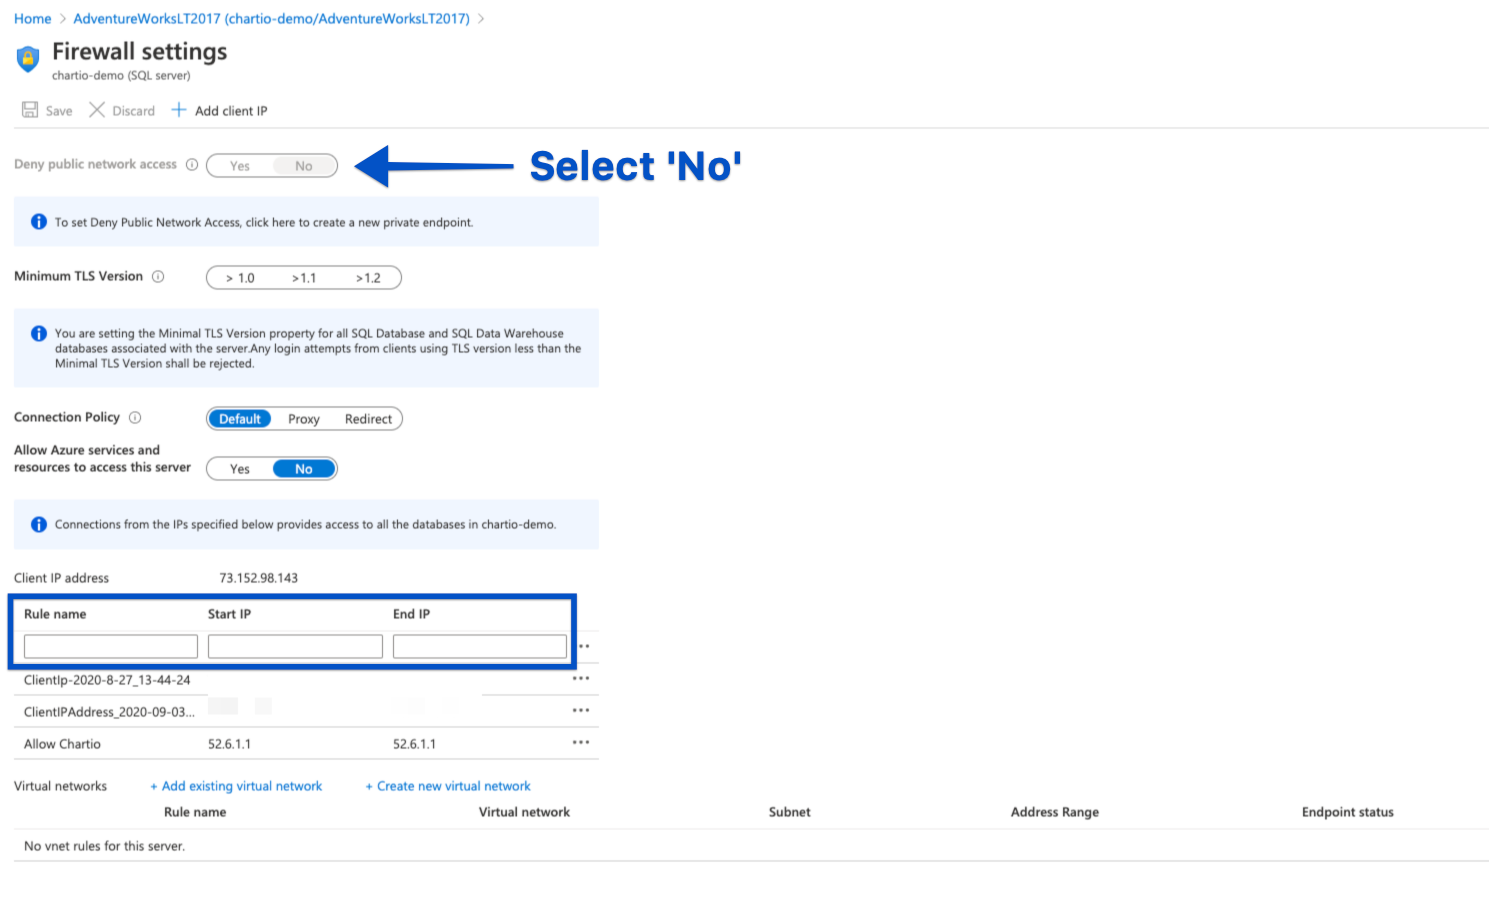
- Click outside of the text fields to add and save the new rule.
Refer to our Microsoft Azure page for further instructions on connecting Microsoft Azure to Chartio.
Microsoft SQL Server
For connections from a local machine
There are a couple configurations you’ll need to make to use Chartio with a local SQL Server:
- Forward traffic from our external IP (
52.6.1.1) on port 1433 to the internal IP address of your desktop computer. - Allow access to SQL Server via the Windows firewall. For more information, refer to Microsoft’s page about configuring the Windows firewall.
If you have an IT person or a network administrator, they’ll know how to do this for you.
Refer to our Microsoft SQL Server page for further instructions on connecting Microsoft SQL Server to Chartio.
PostgreSQL
By default, PostgreSQL restricts connections to hosts and networks included in the pg_hba.conf file. You may need to add Chartio’s IP address to this file to allow connectivity to your database; you’d add the line to pg_hba.config in the following format:
host databaseName username 52.6.1.1/32 md5Here’s an example, where the username is chartio_read_only and the database is mydatabase:
host mydatabase chartio_read_only 52.6.1.1/32 md5
You may need to restart your PostgreSQL server for the changes to take effect.
For more details on modifying the pg_hba.conf file consult the PostgreSQL documentation.
Refer to our PostgreSQL page for further instructions on connecting PostgreSQL to Chartio.
Snowflake
By default, Snowflake instances are open to every IP address, so no action is required. However, you can set up network policies to restrict the IP addresses communicating with your Snowflake instance. If you have any network policies in place, you’ll need to modify those policies to allow Chartio’s IP address (52.6.1.1).
There are two types of network policies you can set up in your Snowflake instance: account level and user level. Account level policies apply to all users unless the policy is overridden by a user level policy. User level policies only apply to the users that the policy is assigned and user level policies will override account level policies.
- If you’ve configured account level network policies, you’ll need to edit your network policy to allow incoming connections from Chartio’s IP address. Please refer to the Snowflake documentation for more information on modifying account level network policies.
- If your organization uses user level network policies, you’ll need to create a new policy to apply to the read-only user you create, allowing incoming connections from Chartio’s IP address. Please refer to the Snowflake documentation for more information on modifying user level network policies.
Refer to our Snowflake page for further instructions on connecting Snowflake to Chartio.