Tunnel Connection
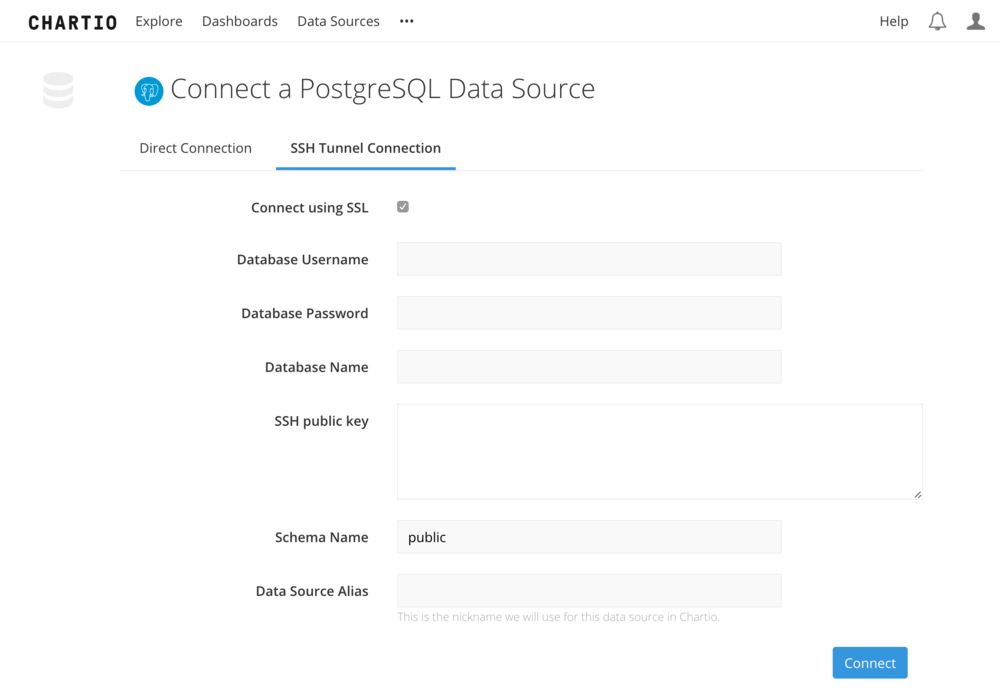
Chartio provides two methods of connecting to your database: Direct Connection and SSH Tunnel Connection.
Direct Connection is the easiest method as it simply requires you to allow Chartio’s IP address (52.6.1.1) and enter your connection details on the connection page.
If your database is on a private network and you do not wish to modify any firewall rules, you can use our SSH Tunnel Connection instead. This entails setting up an SSH tunnel to make an outbound encrypted request from your network to ours.
If SSH traffic (port 22) is routed through a proxy server, you’ll need to use the Direct Connection method.
Chartio's Connection Client has been discontinued for new connections. Existing connections are still supported, but any new connections will need to use another SSH tunnel manager such as autossh.
- Dependencies
- Setup instructions
- Additional considerations
- Troubleshooting
- Uninstalling the tunnel connection
- Moving the tunnel connection
- VPN and reverse SSH tunnels
Dependencies
- Your database listening on all interfaces
-
Ability to make an outbound connection to
connect.chartio.comon port 22.Run
telnet connect.chartio.com 22from the command line to test.
Setup instructions
These instructions use autossh on a Ubuntu/Debian server. For other operating systems, adjust the syntax as needed. We recommend autossh, but feel free to use your preferred SSH tunnel management tool.
Check out our step-by-step video showing how to connect your database to Chartio using an SSH tunnel:
1) SSH key
Create an SSH key if you don’t have one yet.
2) Install autossh
On your database server, run the following to install autossh:
sudo apt-get install autossh
To accept Chartio’s host key, run the following command:
echo "connect.chartio.com ssh-rsa AAAAB3NzaC1yc2EAAAADAQABAAABAQDC6wbEvCi6sz9Igw7uyQ9cIMpiRzkxO/TUEuIM+FIiE1knM9J4VlBz5CFYQZ09OW9ZpPtEDtuumPNtcHJ2xmTZ/6AYvxT5i5A7at83nzG7yM+ErpZ83lB2st9xJ/AzvCopJxvR25kt29dwjstWiDv0tepP3ywBkAWigbpWcATZPjY3vsD/T0QhNzPeP9Xy1WbsbTVS0JAEBaOzmrDQQXuNxV+xtZP2o9CQUwjNMXTI2NL1A7D9wy408sjyNADcWQstIgNf8Uxv/eSo7e7y2g/YEi8gNIApNVcPwZ9dgfg6MK4xAW1TeN4hxrFLm2KKtyRIvwRoCYckpD2IokVK+yU/" >> ~/.ssh/known_hosts
3) Create a read-only user
Chartio requires a read-only user to connect to your database. If you don’t have one already, do so before filling out the connection form in the next step.
MySQL read-only user
SQL Server read-only user
PostgreSQL read-only user
Redshift read-only user
4) Add a new data source in Chartio
In the top navigation, select Data. Click the + New Data Source button. Select your data source type, and switch to the SSH Tunnel Connection tab in the connection form.

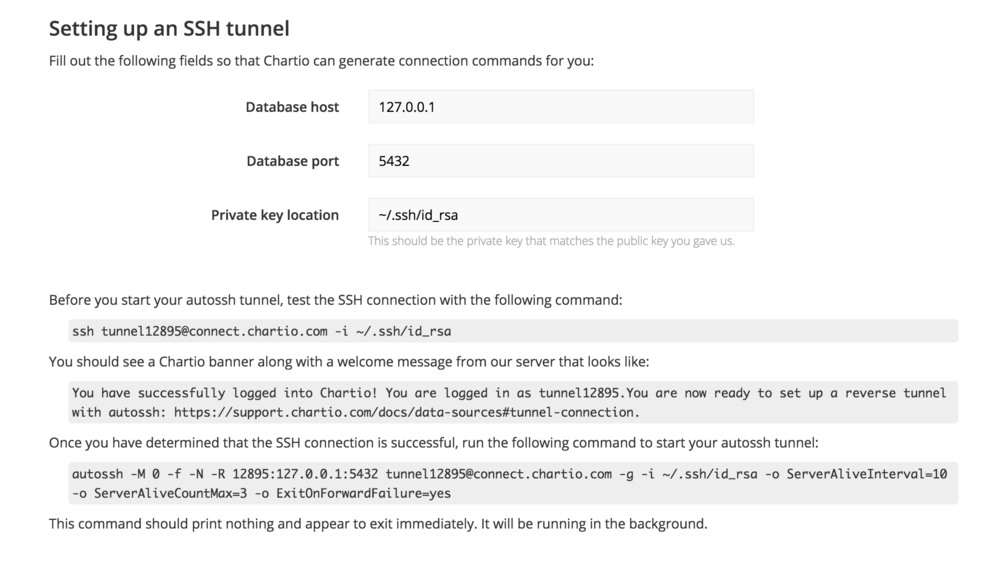
Fill out your Local host, Database port, and your Private key location. Chartio will then generate the commands needed to set up the tunnel. If you are forwarding traffic from a bastion host to your database, then you will need to put the URL for your database in the database host field and this will cause the autossh command string to be updated with the correct host URL.
Before you start your autossh tunnel, test the SSH connection using the command provided in the form. Once that is successful, use the command provided to start your autossh tunnel.
Finally, click Test Connection to test the connection and finish the set-up process.
If there are any errors creating the connection, you will be redirected back to the form where you can edit as needed.

5) Create crontab entry
Once you’ve confirmed that the connection is up and running, you’ll want to add a crontab entry to reconnect the SSH tunnel on reboot. It should look something like this:
@reboot autossh -M 0 -f -N -R 12345:127.0.0.1:5432 tunnel12345@connect.chartio.com -g -i ~/.ssh/id_rsa -o ServerAliveInterval=10 -o ServerAliveCountMax=1 -o ExitOnForwardFailure=yes
Additional considerations
Appending -M 0 disables the monitoring port by default. From autossh’s documentation:
If you’re using a recent version of OpenSSH, you may wish to explore using the ServerAliveInterval and ServerAliveCountMax options to have the SSH client exit if it finds itself no longer connected to the server. In many ways, this may be a better solution than the monitoring port.
Additional connection string settings, such as logging, are available. See autossh documentation for details.
Troubleshooting
Ensure you have added a crontab entry for the connection
Confirm you’ve added a crontab entry to restart the connection on reboot.
If switching from Connection Client, ensure the SSH process is not running
Run:
ps aux | grep ssh
If you see an SSH connection string for the connection that you have switched to autossh, kill it following these instructions for restarting the tunnel connection client.
Ensure tunnel exits when port forwarding fails
Add the following parameter to the end of your connection string to ensure the tunnel connection exits if port forwarding fails. This should help trigger an automatic tunnel restart when needed.
-o ExitOnForwardFailure=yes
Enable verbose logging
The best way to troubleshoot connection issues is by viewing the connection logs. Run the following to check whether autossh is currently generating logs:
sudo grep autossh /var/log/syslog
If there are no results for the above command, add the environment variables below to your shell (for example, in your ~/.bashrc file). They’ll set the location where autossh logs will be saved, and will set the log level to return the most verbose and detailed logs.
export AUTOSSH_LOGFILE="$HOME/autossh.log"
export AUTOSSH_LOGLEVEL=7
Start connection in debug mode
To do this, remove -f from your autossh connection string and add AUTOSSH_DEBUG=1 to the beginning. Our example string now looks like this:
AUTOSSH_DEBUG=1 autossh -M 0 -N -R 12345:127.0.0.1:5432 tunnel12345@connect.chartio.com -g -i ~/.ssh/id_rsa -o ServerAliveInterval=10 -o ServerAliveCountMax=1 -o ExitOnForwardFailure=yes
This outputs the connection log, including any connection errors. If you don’t understand the error messages, please send the output to support@chartio.com.
Check out our step-by-step video showing how to troubleshoot you SSH connection to Chartio:
Uninstalling the tunnel connection
Remove crontab entry
Run crontab -e to enter the crontab editor and comment out the autossh command using ###. Copy the autossh command - you’ll need it in the next step.
Stop the tunnel
Paste the autossh command from the previous step without @reboot, and append stop to the end.
autossh -M 0 -f -N -R 12345:127.0.0.1:5432 tunnel12345@connect.chartio.com -g -i ~/.ssh/id_rsa -o ServerAliveInterval=10 -o ServerAliveCountMax=1 -o ExitOnForwardFailure=yes stop
Moving the tunnel connection
Uninstall connection on old server
Follow uninstall instructions.
Move SSH public and private key to new server
Install autossh on new server
Follow standard installation instructions, using your existing SSH key instead of creating a new one.
VPN and reverse SSH tunnels
We sometimes get asked about VPNs. We currently do not support this type of connection.
VPNs are useful to bridge two different private networks. They require additional configuration of network routing rules and firewall rules.
Our reverse SSH tunnel, on the other hand, maps a single IP and port in one private network into another. Very little network routing setup is required and very few firewalls rules need to be configured.
Conversely, a poorly configured VPN could give Chartio access to every server in the private network or vice versa. In addition, AWS places limitations on the number of VPNs or peer-ed VPN networks. Meaning, it would be difficult to scale VPNs as easily as we can reverse SSH connections.
Reverse SSH should be just as secure from an encrypted tunnel perspective, with a much simpler implementation.
Generate an SSH key
Check for an existing SSH key
First, we’ll want to check for existing SSH keys on your server. From the command line, enter:
ls -al ~/.ssh
If a key exists, skip ahead to the Retrieve your public key step.
Create an SSH key
Run the following command to generate an SSH key. We recommend including a comment to label the key.
ssh-keygen -t rsa -C "Your comment here"
You’ll be prompted to choose your save location. To use the default location (recommended), press Enter.
Next, you’ll be prompted to enter a passphrase. Do not enter a passphrase. Press Enter twice to continue.
Retrieve your public key
Navigate to your SSH folder, or run the following command to find your public key:
ls -la *.pub
Retrieve the contents of your public key file with the following command. Edit the file location as needed.
cat /Users/username/.ssh/id_rsa.pub
Keep your public key handy - you’ll need to enter it in the connection form on chartio.com. Add a new data source from the website, then follow the instructions there to finish setting up the connection.
SSH permissions
Permissions should be set up correctly by default, but you can use the following commands to correct permissions if needed:
chown -R username \~/.ssh
chmod 700 \~/.ssh
chmod 600 \~/.ssh/id_rsa