Authentication
Permissions required: Owner
Chartio currently supports three login types for users:
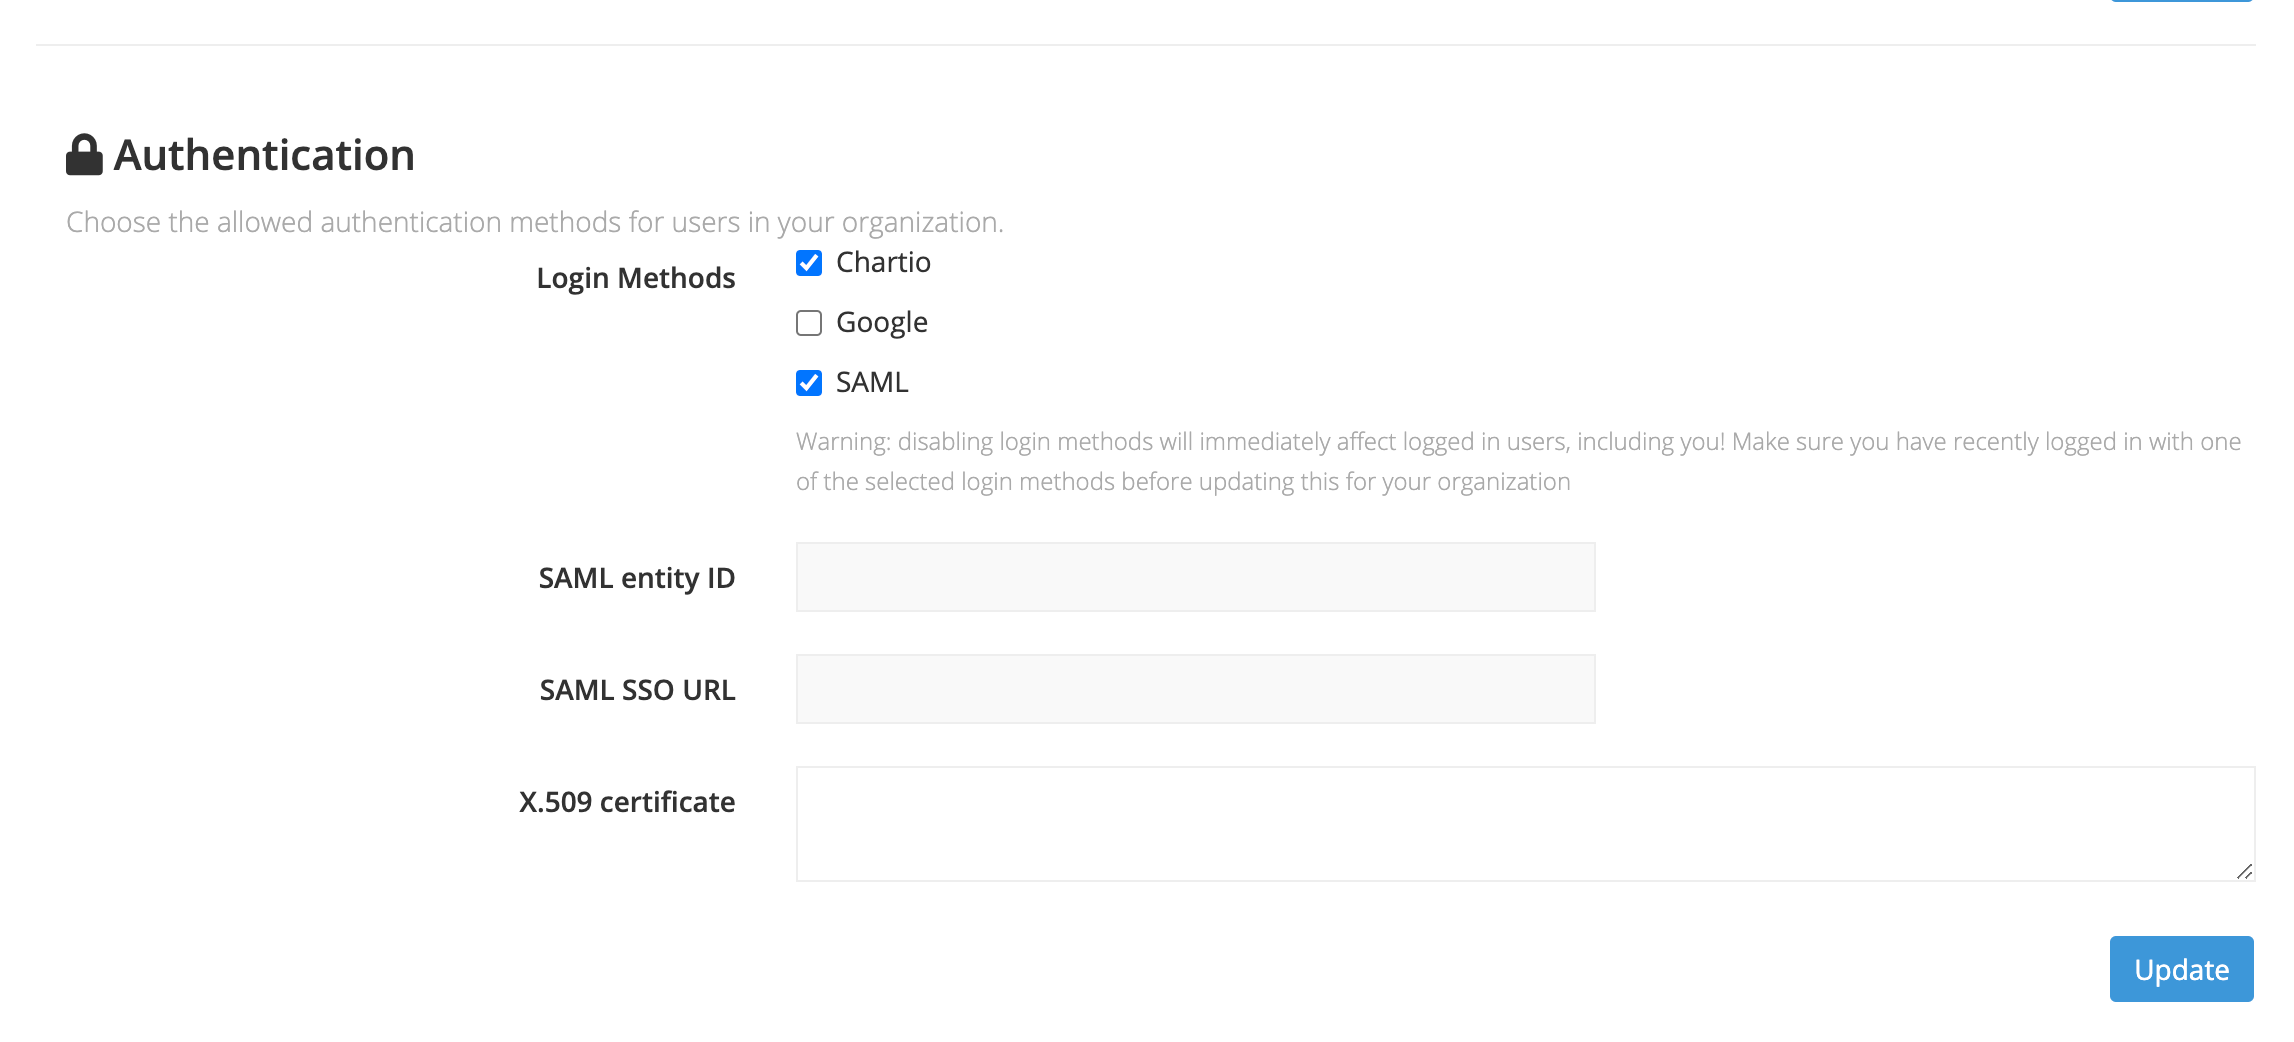
To enforce a specific login type, change your authentication settings by selecting Admin > Settings from the top navigation. Find the Authentication section, adjust the settings as needed, and click Update to save your changes.
Note: Disabling login methods will immediately affect logged-in users, including you. Make sure you have recently logged in with one of the selected login methods before updating this for your organization.

SAML and permissions
Chartio supports Single Sign-on (SSO) using SAML.
Enforcing SSO login has many benefits for both you and your users. It allows users to log in to Chartio quickly and easily, and allows admins to manage their users from one centralized location.
If a user logs in to Chartio via SAML and has not previously been added to a Chartio team, they’ll be added to a team called SAML Added Users. If you grant permissions to this team, note that those permissions are shared with any new user who is auto-added to the team.
If you choose to enforce only Google or SAML authentication, a user whose Google or SAML account access is revoked may not immediately lose access to Chartio. If the user is currently logged in to Chartio at the time of their removal, their session may stay active for up to seven days.
Azure
Add the Chartio app to Azure
From your Azure Dashboard, select Azure Active Directory from the far left navigation. Then, choose Enterprise applications from the Overview panel.

Next, click + New application.

In the Add your own application section, select Non-gallery application. Enter Chartio in the name field, then scroll down and click Add.

Add users to this application as needed. Steps for this are not shown as this is implementation-dependent.
Obtain Azure SSO details
From the side panel, select Single sign-on then choose SAML.

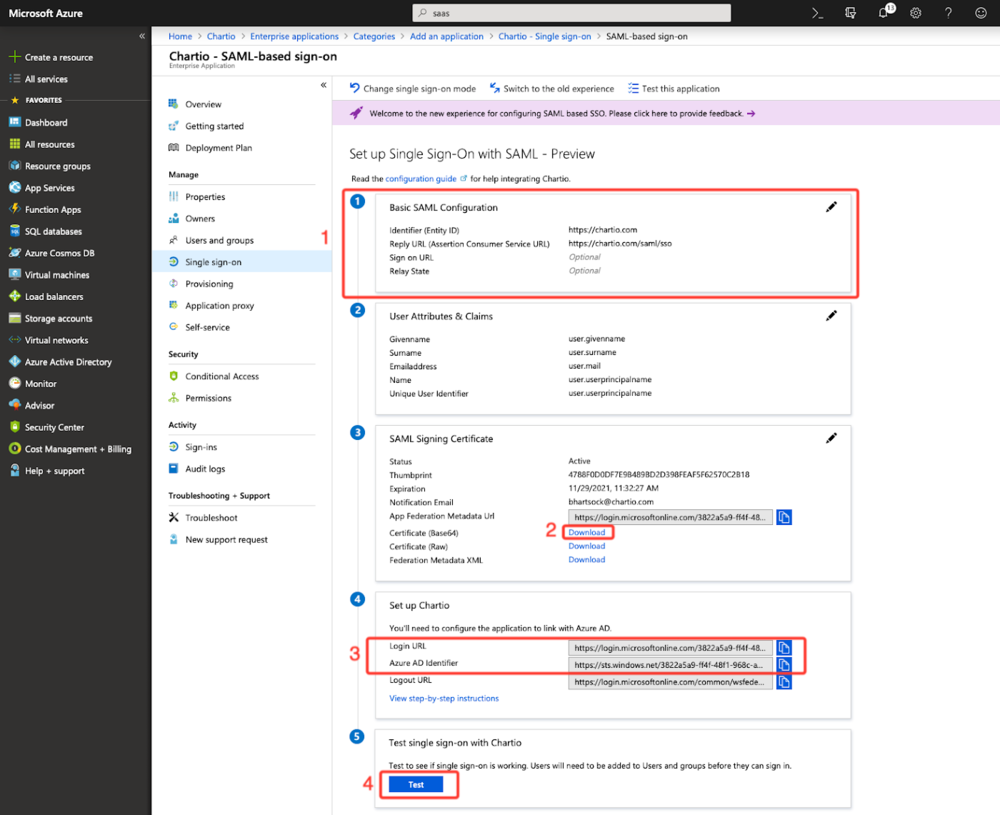
In the Basic SAML Configuration section(1), enter the following values:
- Entity ID:
https://chartio.com - Reply URL:
/saml/sso
Obtain the following values and keep them handy—–you’ll need to configure them in Chartio in the next section:
- Download the signing certificate (Base 64)(2). Open this file in a text editor.
- Login URL
- Azure AD Identifier
Once those three values are configured in Chartio in the next section, click Test(4) and follow instructions to test the integration.

Add Azure SAML settings to Chartio
Once you’ve added the Chartio application to Azure, you’ll need to add your SAML settings to your Chartio account.
Navigate to your organization settings page by selecting Admin > Settings from the top navigation. In the Organization tab, scroll down to the Authentication section and check the SAML checkbox under Login Methods. If you want your users to only log in via Azure, also uncheck the other login methods.
Selecting SAML will show the following form fields. Enter the SSO settings you located in Azure in the previous step and click Update to apply the changes:
- SAML entity ID: enter the Azure AD Identifier
- SAML SSO URL: enter Login URL obtained from Azure
- X.509 certificate: text value from signing certificate (Base 64) you downloaded from Azure
Okta
Add the Chartio app to Okta
From your Okta Dashboard, navigate to the Admin section and select Applications from the top navigation. Click Add Application.
Type Chartio into the search box, and click Add next to our application name.

Review the application settings, using the Next buttons to navigate through. Assign the application to your users as needed and click Done when finished.
Obtain Okta SSO details
Once the Chartio application has been saved to your Okta account, you’ll be redirected to the application’s settings page. If not, find it from your Dashboard.
Switch to the Sign On tab. Scroll down to the View Setup Instructions button and click it.
Keep this page handy - you’ll need this information in the next step.

Add Okta SAML settings to Chartio
Once Chartio has enabled SAML login for your organization, you’ll need to add your SAML settings to your Chartio account.
Navigate to your organization settings page by selecting Admin > Settings from the top navigation. In the Organization tab, scroll down to the Authentication section and check the SAML checkbox under Login Methods. If you want your users to only log in via Okta, also uncheck the other login methods.
Selecting SAML will show the following form fields. Enter the SSO settings from the Setup Instructions in the previous step and click Update to apply the changes:

OneLogin
Add the Chartio app to your OneLogin account
Go to your OneLogin admin console, and select Apps > Add Apps from the top navigation. Type Chartio into the search box then click our app name.

A configuration panel for the Chartio app will appear. Find the Connectors section and change the Connector Version to SAML2.0. Click Save when finished.

Obtain OneLogin SSO details
Once you click Save, you’ll be redirected to the Chartio app’s settings. Switch to the SSO tab and keep this information handy - you’ll need it in the next step.
Add OneLogin SAML settings to Chartio
Once Chartio has enabled SAML login for your organization, you’ll need to add your SAML settings to your Chartio account.
Navigate to your organization settings page by selecting Admin > Settings from the top navigation. In the Organization tab, scroll down to the Authentication section and check the SAML checkbox under Login Methods. If you want your users to only log in via OneLogin, also uncheck the other login methods.
Selecting SAML will show the following form fields. Enter the SSO settings you located in OneLogin in the previous step and click Update to apply the changes.
- SAML entity ID: enter the Issuer URL from OneLogin
- SAML SSO URL: enter the SAML 2.0 Endpoint from OneLogin
- X.509 certificate: in OneLogin, click “View Details” below the certificate box and copy the certificate. Paste it here.
Note: Make sure to remove the “BEGIN” and “END CERTIFICATE” lines from the X.509 certificate.

Additional SAML Identity Providers
The following identity providers have not been tested by Chartio but have been successfully configured by our customers:
- Idaptive
- Rippling
- PingID
To use one of the above providers, follow these basic setup instructions:
- Add Chartio as an application in the identity provider’s admin panel using the following settings:
- Entity ID:
https://chartio.com - Reply URL:
/saml/sso
- Entity ID:
- Obtain SSO details from the identity provider
- SAML entity ID (also called Issuer URL)
- SAML SSO URL (also called Endpoint URL, Login URL)
- X.509 certificate (signing certificate)
- Add SAML details to Chartio (Admin > Settings > Authentication)
Two-factor Authentication (2FA)
Chartio does not directly support two-factor authentication. We recommend using Okta or OneLogin as a SAML provider instead; they both support 2FA and we can force users to login via one of these providers as a configuration option in Chartio.