Manage Dashboards
Once you’ve created a dashboard, you can use it a number of ways–from sharing it with others, cloning it to tweak and re-use, and re-arranging the charts and elements within it.
You can also manage your dashboards to keep your Chartio instance organized and up-to-date. Try organizing your dashboards using dashboard categories, or using our Dashboard Cleanup feature to archive unused dashboards.
Dashboard categories
When you create a new dashboard, you have the option to organize it into a dashboard category. Chartio recommends making use of categories to organize your Chartio dashboards into a nice folder structure. This helps keep your Chartio instance organized and dashboard easy to find by subject.
When creating a new dashboard in Chartio, the default will be to create the dashboard in your personal sandbox.

Your personal sandbox should be used to store dashboards you’re currently working on or for personal use. If dashboards are considered ready for publishing or for others to view and use, we recommend moving them to a category with other dashboards on the same topic or for the same team.
Nested dashboard categories
To further customize your dashboard categories, you can create nested categories which will act as subsections of the main category.
To nest dashboard categories, navigate to a dashboard’s settings and fill out the Category input using the following format: Outer folder > Inner folder

You may use as many nested category levels as needed.
Add a category
When you’re creating or updating a new dashboard, type the new category in the dashboard’s Category field then click Create or Update, respectively.
Update a category
After a dashboard has been created, you can move it to a new or existing category in the dashboard settings.
To do this, open the dashboard in question and navigate to its dashboard settings. Under the General tab, scroll down and edit the Category field.
As you start typing in the Category field, a list of options will appear with the existing categories and sub-category matching your text. If the category you want doesn’t exist yet, just type it out as wanted and click Update at the bottom right of the Settings page.
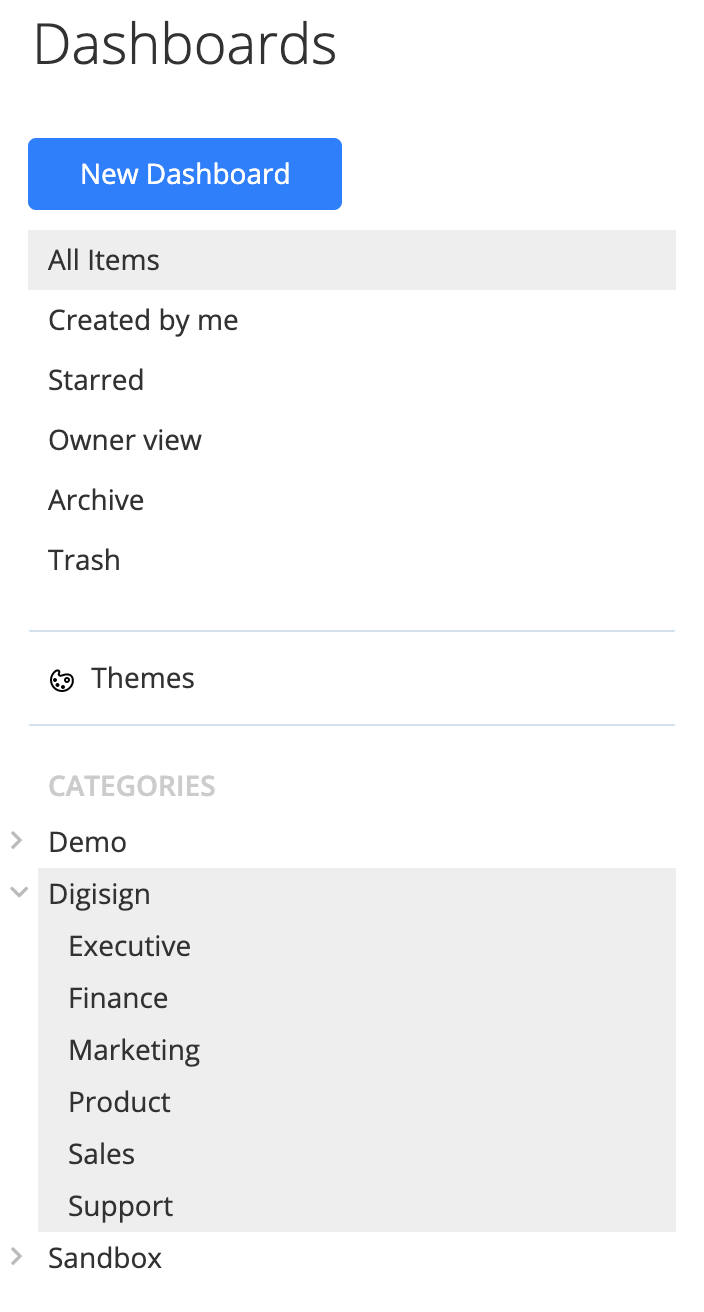
When you go back to the main page, you’ll see your new category appear under the CATEGORIES section in the left sidebar. Clicking on a specific category will filter your dashboard list to only include options fitting within this category.
Note: You may see different options under the CATEGORIES depending on the dashboard filter selected.
For example, “All Items” will show all categories relating to all the dashboard you have access to whereas the “Created by me” view will only show the categories with dashboards which you’ve created.
If you have more than one dashboard in a category, you’ll need to update the category for each dashboard with the new category name. If you don’t update all of them, the updated category will be created, but the old category will still exist.
Delete a category
To delete a category, you’ll need to move or delete all dashboards from the category. When a category no longer has any dashboards associated with it, it’ll automatically be deleted from the Categories list.
Arrange dashboard items
All dashboard items (charts, Controls, elements) have a draggable area that is used to move the item. When you hover over the draggable area of a dashboard item, you will see a 4-way cursor icon and the item will have a dashed border. Click and drag from that area to move the item.
Charts can be moved by clicking and dragging on their title bar, or on the top edge if there is no title. Controls can be moved by clicking and dragging on the left side of the object, where the icon resides (except the Date Slider, which is draggable from the top). Rulers are draggable from anywhere.

Arrange multiple items at once
You can also move multiple charts at once. To do so, select multiple charts by either of the following methods:
- Click and hold on an empty space on your dashboard, and drag the gray box that appears over the charts you’d like to select
- Hold down either
Shift,Ctrl, orCommand(Mac), and click each chart individually - Use
Command + AorControl + Ato select all charts and elements on a dashboard

Selected charts will have a blue outline. Drag them as you would a single chart to move all of them at once.
Resize charts
Click and drag from the bottom-right corner of a chart to resize.

Favorite a dashboard
Add a dashboard to your list of favorited dashboards by clicking the Star next to the dashboard name from either the dashboard settings or the landing page. View all your favorited dashboards by clicking Starred from the left sidebar of the landing page.

Dashboard Cleanup
Permissions required: Owner
The Dashboard Cleanup feature allows you to quickly bulk archive dashboards that are no longer in use.
On the dashboard landing page, you’ll see a button near the top-right called Dashboard Cleanup. Click it to open the Archive modal.

By default, the preview shows dashboards that haven’t been viewed by anyone in your organization for the last 12 months. If desired, change the Number of Months input and click Preview to update the preview.
When ready, click Archive to archive the dashboards listed in the preview.
Note: Embedded dashboards are excluded from the Dashboard Cleanup tool.

Archive a dashboard
Permissions required: Dashboard Admin
If a dashboard is not in use but should be kept for reference, archiving is a great way to keep it around just in case. The Archive is also useful as a holding space for dashboards that are potentially not in use, but need confirmation from Teammates before deletion.
Archive a dashboard by doing either of the following:
- Click Archive at the bottom of the dashboard’s settings
- From the landing page, click the dashboard’s ellipsis menu > Archive
What you should know:
- A dashboard stays in the Archive indefinitely, unless a Dashboard Admin restores it or moves it to the Trash
- Dashboard Editors and Viewers can see the names of dashboards in the Archive that they have access to, but they can’t see the actual dashboards and can’t restore or delete them
- When a dashboard is in the Archive, queries are not run for its charts, and any scheduled reports are not sent

Delete a dashboard
Permissions required: Dashboard Admin
Delete a dashboard by doing either of the following:
- Click Move to Trash at the bottom of the dashboard’s settings
- From the landing page, click the dashboard’s ellipsis menu > Trash
Deleting a dashboard moves it to the Trash. Dashboards stay in the Trash for 30 days before permanent deletion. Within that 30-day period, a dashboard in the Trash can be restored or moved to the Archive.
What you should know:
- A dashboard stays in the Trash for 30 days and is then permanently deleted; once permanently deleted, we cannot restore the dashboard
- At any point before the 30 day limit, the dashboard may be manually moved to the Active or Archive sections
- Dashboard Editors and Viewers can see the names of dashboards in the Trash tab that they have access to, but they cannot see the dashboard contents and cannot move the dashboard out of the Trash

Restore a dashboard
Permissions required: Dashboard Admin
Archived or deleted dashboards can be restored. From the landing page, click Archive or Trash from the left sidebar and switch to the list view. Click the dashboard’s ellipsis menu > Restore.

Clone a dashboard
Permissions required: Dashboard Admin or Editor
Open the dashboard’s settings by clicking the settings button in the dashboard’s sidebar and click Clone. You’ll be redirected to the cloned dashboard.
Note: Cloned dashboards do not stay in sync with the original dashboard.

Share a dashboard
Share your insightful dashboards with the rest of your organization by granting access or providing links to them. Check out how to Share Dashboards for more details.
Export dashboard data
Chartio offers the ability to download your dashboard in PDF or CSV format. Downloading as a CSV results in a .zip file containing a CSV for each chart on the dashboard.
From your dashboard, click the Download button on the sidebar menu. Choose “Download as PDF” or “Download as CSV”.

Creating page breaks in PDF exports
You can create page breaks for your PDF download in Chartio. We recommend designing your dashboards so each “page” is approximately every 15 grids.

Dashboard views
By default, the right sidebar on each dashboard is expanded to show the full dashboard element list and names.
Minimize sidebar
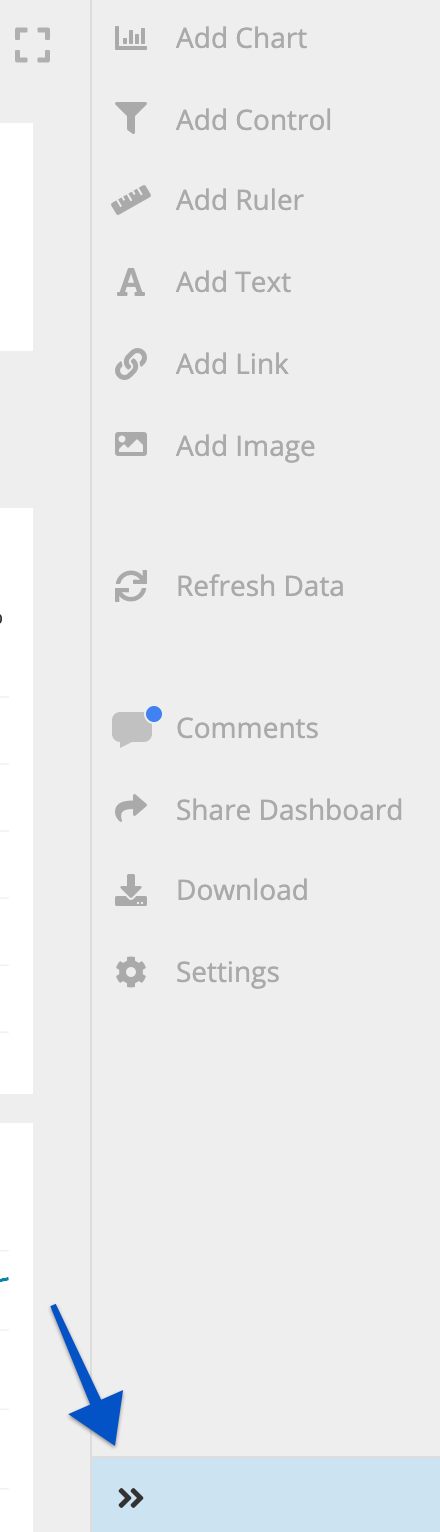
Once you’re familiar with dashboard elements, you may no longer need to see them all listed on your dashboard’s sidebar. You can minimize a dashboard’s sidebar, while still being able to add new elements and access the settings. Simply click on the double arrows (») at the bottom of the sidebar to minimize it.
To reinstate the full sidebar view, click the double arrows («) again.
Full screen
If you’re displaying a dashboard on a TV, presenting it, or just want to hide the sidebar, you can switch your dashboard to full screen. To do this, click on the Expand icon (). This will hide the sidebar altogether.

If you’re using a browser extension and want to loop through several dashboards in full screen mode, you can also add ?present=1 to the end of the URL query string. This removes the top navigation bar and right sidebar from your dashboard, similar to clicking the Expand icon.

To exit full screen mode, click the Expand icon again to re-display the sidebar in the previous view.
